Showing posts with label a to z. Show all posts

Jun 3, 2011

A-Z of me

I got this off of Made by Trisha's blog. This feels super old school, but I thought it would be fun to post a little about me.

A. Age: 31, turning 32 on the 29th!
B. Bed size: queen, just downgraded from a king that was just taking up too much space in my room.
C. Chore that you hate: scrubbing... though I may need to take one for the team and scrub the pool edge this weekend  
my Tiffi!
D. Dogs: 1, 15 year old mini-pekingese named Tiffi
E. Essential start to your day: a walk for Tiffi. more essential to me than her, but she won't let me wake up without bothering me to go out
F. Favourite color: right now i'm still stuck on green (lime or apple) 
G. Gold or Silver: Silver
H. Height:
5 foot
I. Instruments you play: i took piano lessons for like 2 years. i can play mary had a little lamb 
J. Job title: Network Operations Coordinator (day job) / CFO...lol (Handmade Miami) 
K. Kids: are really cool little people. I'll get a few of my own one day :) 
L. Live: in Miami, Florida 
M. Mother's name: Ana Rosa, but she goes by Rosie 
N. Nicknames: D, Di, Dianaita 
O. Overnight hospital stays: none
P. Pet peeve: stupid people 
Q. Quote from a movie: this is the first one that came to mind, "Life moves pretty fast. If you don't stop and look around once in a while, you might miss it." -Ferris Bueller 
R. Right or left handed: right
with my little brothers, Richard & Angel
S. Siblings: two younger brothers that now look older than me 
T. Time you wake up: 6am on weekdays... 7:30-8ish on weekends
U. Underwear: apparently hipsters, since victoria's secret stopped carrying low rise bikinis 
V. Vegetable you hate: until about two years ago, vegetables and I were mortal enemies. but we've grown to love each other. still not a fan of cucumbers though 
W. What makes you run late: other people. 
X. X-Rays you've had: shoulder, teeth
Y. Yummy food that you make: anything! I always get request for my brushetta topping. And I make a yummy chicken picatta
Z. Zoo animal: giraffes. especially since they have a giraffe feeding station at Zoo Miami.

Oct 31, 2009

Happy Halloween!

From me & my doggie Tiffi, and our fabulous pill-box hats

Oct 4, 2009

S is for Stitch Rock!

Once again designed by Diana was at Stitch Rock in Delray Beach, FL. I can't say enough good things about this show. It's definitely my favorite show of the year!

I was really bummed this year cause I didn't make it in the initial cut of vendors for Stitch Rock. But I got an email a few weeks ago, that there was a space available for me because of a cancellation. I was so ecstatic, you have no idea. So I got the sweatshop working in full effect and sewed my butt off. (Muchisimas gracias a Abuela por toda la ayuda con los delantares pequenos!-Tons of thanks to Abuela for her help with the half aprons!)

I had an upstairs booth this year, so I thought I wouldn't do as well as last year, but boy was I wrong. We had tons of customers come by. The new booth setup and concentration on my retro-inspired aprons really made a difference I think. This year I wanted people to be able to walk into the booth and shop like they were in a tiny boutique. So I set up my table along one side and the clothes rack in the back corner. This way the customers can walk right in, take a look, chat a little, and even try on their aprons without being in the way of the traffic in the aisles. I have to say that I do love this set up and will definitely be using it more often. I also got a new mannequin that is awesome to use for the shows. Thanks again to Mimi for the mannequin. I love the professional look it gave the booth. This mannequin still is not named, so if anyone has any great name ideas for her, just leave a comment.

There was a line around the block before the show opened. And that line lasted til about 2 hours into the show. People love their Stitch Rock! The need for handmade goodies is definitely apparent here in South Florida. The other vendors were all awesome too. Tons of cool items and handmade goodies you can't find anywhere else. If you want to shop some of the best crafters and indie goodies in South Florida, Stitch Rock is the place to go. It may sound a bit far for us Miami-ans, but the hour drive into adorable downtown Delray Beach is so worth it. (Plus, there was barely any traffic!) And check out the vendor list on their website to order some of the goodies from my fellow Stitch Rockers.

This year poet, Renda Writer, performed some of his poetry during the show. It was cool to have a performance going on. And as you can see from the picture, the shopping was still in full effect!

Also this year, I submitted one of my Retro D Aprons to be in the Stitch Rock fashion show. It was so awesome to see my work out there on the stage. The only thing that sucked is that my pictures of the fashion show came out terribly. But at least the aprons got tons of exposure.

As always Mom was there as my trusty assistant. And she even brought some of her crafts too. Moms handmade scarves were a hit, even her in warm South Florida. People just couldn't resist the cool textures and awesome colors of them.

Thanks to all the customers that bought some designed by Diana goodies. We sold a little bit of everything, bags, wallets, pouches, aprons and scarves. I'm so happy to know a lot of designed by Diana goodies have great new homes.

And a great big thanks to Amanda for once again putting on a great show. Having been to a few other shows throughout the year, I always compared them to Stitch Rock, and the well-organized, well-run show that Amanda puts on every year. Keep it up Amanda!! And see you there next year.

Sep 9, 2009

R is for Remastered and Rockband too

At last the day has arrived. 9.9.09! Yeah it's cool cause it's all nines, but that't not why I'm so excited. Today is what I have dubbed Beatles Day! The Beatles are exploding all over again today for a new generation to get to know and love them.

A lot of the hype has been about the new Beatles Rockband coming out. And let me tell you, from what I've seen of it, it looks awesome. The limited edition set comes with Beatles style drum set and guitar. And you can also now do three-part harmony just like the Fab Four. Unfortunately I don't have a gaming system, but I can't wait to play it with someone who does!

Also coming out today is the newly remastered Beatles catalog. The new Beatles remastered set has every album the Beatles released (in mono and stereo) plus the singles, a new DVD and tons of new Beatles pics. I can't wait to hear these songs that have been remastered from the original tapes.

Now I've read a lot about these releases, and seen those that rebuff the Beatles. But just a little history to put them in perspective. They are the first boy band. You see the girls that screamed about the New Kids on the Block, N*Sync or the Jonas Brothers? Those girls are just copying what our mothers did for the Beatles. Ever hear feedback on a rock song? Yup, The Beatles did it first. They combined world music instruments (the sitar) into their pop songs before anyone else did it.

And you've probably heard more Beatles songs than you even realize. "Hey Jude," "Hello, Goodbye," "Yesterday," "All You Need Is Love," "Can't Buy Me Love," they are all iconic rock songs made by this one band. There are so many more that are recognizable I can't even list them all.

Needless to say, I was raised in a Beatles household. When my parents got married they each had the album (on vinyl) of Sgt. Pepper's Lonely Hearts Club Band. My brothers are musicians and love The Beatles and I do too. So go out there if you haven't already and listen to those lads from Liverpool. Listen to rock n' roll history being made!

P.S. My fave Beatles albums are Revolver and Rubber Soul. My fave songs are "Blackbird" and "In My Life." Let me know what your favorite Beatles songs and albums are!

Sep 6, 2009

Q is for Questions


The frequently asked kind, or FAQs, as they call them. So I figured I'd give you the FAQs of designed by Diana.

Who makes all of this stuff?I do! Which is why it's called designed by Diana. It's me and my little hands that do it all. It's guaranteed that Diana made the item you are purchasing!

How did you learn to sew?
I get this one a LOT. Now I don't think I actually technically even really sat down and was taught to sew. I just did it. I guess I have to chock it up to genetics and family history. I always saw grandma sewing, so I just picked it up and started. I haven't looked back since.

I love this wallet (pouch, apron etc.), can I get it in another pattern/color?
Of course you can. Just message or email me with the color or pattern that you'd like and I'll be happy to make a custom one for you.
How long will my custom order take to be completed?Depending on the size and complexity of the item and the other orders that I already have, your order should take about two weeks. This time may be a bit longer around the holidays though.
I don't have PayPal, can I still order from your online store?Definitely. I also accept Money Orders. And you can also pay via credit card without having a PayPal account. Don't log in on the right hand side of the page, instead follow the insructions on the left and your credit card will be processed without the hassle of setting up an account.

I ordered an item online, how long will it take to ship?
All of the items in my online store are already made and should ship in 2-4 days after your payment clears.
Those are the most frequently asked questions for designed by Diana. If you have any other questions, just let me know and I'll answer them as soon as I can.

Aug 29, 2009

P is for Pasteles

Back to the ABCs. Here is the P entry, Puerto Rican pasteles!

My great-grandmother was from Puerto Rico and many other family members came from the island too. Pasteles are kind of like tamales, but not... LOL Making pasteles is a day-long event. It's always a party since so many hands are needed in the kitchen. This time I took lots pics to show off one of the many DIY events my family loves. (You can click on any of the pics to get a bigger view.) So here for everyone to see, is how to make Puerto Rican pasteles. (NOTE: Like any other family recipe, this will vary, but this is the way we make em.)

First you need to make the "masa" (the outside of the pasteles). For the masa, you need green bananas. I verified with Mom and what you need are regular run of the mill bananas, not plantains, not manzanos (the little bananas), but plain old bananas, but t
hey must be green. You'll also need a malanga (a root vegetable, and I have no idea what it is called in English).

Here's a malanga--a HUGE one!

First off, you peel the bananas and the malanga. Malanga is peeled much like a potato is. I'm sure you could use a vegetable peeler to do it, but in this respect you gotta keep it old school. And the rumour is that my great grandmother forbade anyone from using a peeler to peel potatoes or anything else, so a knife and some elbow grease is the way to get it done.
Peeling old school style

Then get out the cuisinart or food processor whatever you call it. Put on the grating blade and grate the bananas and the malanga. Now back in the day I remember seeing them use hand graters to make the masa. It took so long and there wer so many grated fingers and busted knuckles. Now everyone has their food processor, which I only ever see used for pasteles making. Technology does have its perks! It's such a faster process.

My grandma's coveted food processor

The masa mush


The masa now looks like grey mush. Not too appetizing. But of course, it's not done yet. You have to add some annatto oil. Annatto is a seed that gives off color and some flavor too. Just steep the annatto in some oil until the oil is a deep gold/orange color. Then just add some oil to the masa until you get the desired color. It should look orangey-yellow, like this:

Now you have the outside of your pasteles, but you need something to fill them with. You can fill them with pretty much anything, but traditionall we use pork. And hey you can never have enough pork. So here goes the filling. You get a big hunk of pork and cut it into little cubes. Kinda like competition chili, no ground meat, only cubed.

My aunts chopping up the pork

Now the meat is cooked before it's put in the pasteles, and it's seasoned deliciously. First you start with a "sofrito." A sofrito is the way most latin dishes are started. You saute onions, garlic, and some peppers in some oil until they are tender, but have no color. Just the smell of a sofrito cooking up is enough to make you hungry!
the sofrito

We happened to have some "oregano criollo" from the yard that day. I'm thinking it's just some version of country-type oregano, but don't quote me on that. So it got chopped up and added into the sofrito too.

the "oregano criollo"

Then the meat was added in. It was cooked along with some tomato sauce, and I bet even a little bit of the achiote oil from earlier.
cooking up the filling

Here's the meat all done. Now, of course, we had to taste test, cause you don't want bland meat going into your pasteles. Luckily, we made a little extra and sampled it on some Cuban bread.

mmm...

Now that all the components are ready, it's time to get to the assembly. Now you can do this lots of ways. If you wanna go really old school, you can wrap it up in a banana leaf. The next step up from that is parchment paper and some kitchen twine. I remember seeing them made this way when I was younger, the twine wrapping was always so fascinating, but so confusing. But thanks once again to technology, we use aluminum foil now. Luckily my mom had stumbled upon these already cut sheets of aluminum foil at the dollar store. So we were on our way.

the wrappers

Now you have to prevent the pasteles from sticking to the aluminum foil, so you can use some Pam or other cooking spray. We didn't have any, so we went old school on this. Just a dish with oil. Dip your hand in and spread some oil on the foil. Then plop a spoonful of masa in the middle. Make a well in the center of the masa to hold the meat.

the well in the masa

Then you spoon in some meat. Make sure it's not too much though, you want it to stay on the inside.
spoon in the meat

Then, with your spoon, move some of the masa on the outside of the well over the meat to cover it. You should have a mountain-looking masa pile. It may look weirdly-shaped, but it will all be fixed in the next step.

cover with masa

Now all you have to do is wrap it up. Bring the long sides together, and fold over the foil a few times to seal it. Then fold over the sides a few times too to seal those up. You should be forming a tight rectangle. Try to get all the air out, wrap it up tightly, you don't want a leak.

wrapping the pastel

Ta Da! You now have a pastel! At this point you can cook them up or freeze them for later consumption.

ready to cook or freeze

Now just keep making pasteles til you run out of meat and masa.

pile them up

Now after doing all that work to make them, it's time to eat. To cook your pasteles, boil the for about 20-30 minutes.

boiling them

cooked up and ready to eat

When they are done, the aluminum foil will look burnt, but don't worry. Its supposed to look like that. It's just the aluminum foil that is a bit burnt.

Ideally, you should let your pasteles cool for a bit so they don't stick to the wrapper, but patience was not in high supply that day.

so we got a little overzealous and it stuck a little, but it still tasted good

Everyone dug right in and enjoyed their pasteles. All the hard work of making them, sure is worth it.

lunch is served

Eat it up

The last bite!

I hope you enjoyed seeing my pasteles tutorial and got an idea for something a little different!

May 26, 2009

O is for OPEN

The designed by Diana website store is now open for business!

This store will feature web-only exclusives and very limited edition items. So you'll have to check back often to see what is there.

Our first items are a few great customs that I've done for a few people. And now here they are for everyone to enjoy:

Firstly, for all the brides-to-be out there, my "Toss Me" Garter Set. This is a matching set of 2 garters, one to keep and one to toss. They are made of satin and hand embroidered with your monogram. This is a great keepsake for your wedding and even a great gift for any friends that are getting married. This item is custom made when the order is received, so it will take at least 2 weeks before it is ready to ship. We can make it in blue (for your "something blue") or a variety of colors to match your wedding. I first made this garter set for my friend, Erica, who is about to celebrate her first wedding anniversary. They were the perfect addition to her wedding ensemble, and they are sure to be a great addition for anyone.


Next, we have the dbD Lunch Bag. I created this lunch bag for myself. I got so many compliments in the lunchroom at the office, that I took a few orders for more. I'm really proud on the design of this one. It's made in our cool dbD prints and is lined with ripstop nylon for easy cleanup. The bag is also interfaced and lined with insulated batting, so it'll keep your food cold or hot (just not both at the same time!). I made it large enough to hold an entree size tupperware and you'll still have plenty of room for snacks. These lunchboxes are great for kids and adults. This lunchbox can be customized in any of our dbD fabrics, so if you want a custom one, just contact me and I'll get one started for you. Bringing your lunch never looked so cool.


I hope you like the items up on the new website. Some new items are in development and will be coming to the website store soon.

May 15, 2009

N is for New

My new website is up, finally! I've been working on it and I'm pretty happy with how it came out. It's still the same URL: http://designedbydiana.com/

I'm really liking this new site, and I hope you do too!
This new site has a new and improved photo gallery. You'll get to see some custom items, events, and even my studio. We also have the dbD blog, a little info about dbD, and all our contact info. Plus I have a page for all of my favorite links, so check them out and see if you find some new faves too.
This new site also has a store, which will be opening next week. My etsy store will still be the main place to get the majority of the items, but I'll have some surprises on this store for all of you. Just stay tuned and you'll hear all about it. And there is a link to my etsy store on the store page of the site, so all you have to remember is designedbyDiana.com

I'd love to hear what you think about the site! So just comment below and let me know!

May 10, 2009

M is for Mom!

Alas, Mother's Day is upon us once again. And after racking my brain for gift ideas for all the moms in my life, I got inspired and made up something oh-so-cute for Mom and the MIL.

This year the ladies got some great girlie movies. But this is Mother's Day, I couldn't whole-heartedly just wrap up the DVD and call it a day! So I made them each themed giftboxes with little trinkets that went along with the theme of their movie.

First my Mother-In-Law, Ana. I got her "Hope Floats." So to package it all up, I got a little wooden crate and lined it with straw. With a paint pen, I wrote "My cup runneth over" on one side and "Hope is the stuff that floats to the top" on the other (both are lines from the movie). I draped over a bandana print fabric that I had to line the box. Then in went the DVD. I also made her a Flower Pen Pot. It had yellow flowers, just like the ones Justin Matisse gives to Birdee at the end of the movie. I was gonna make the galvanized pitcher into a candle, but i worried about the narrow mouth and a flame. So I filled it up with sugar-free chocolates. I wanted to give this one a very country feel. I know she'll like it, it's totally her style! I'm not sure if she's seen Hope Floats, but I know she'll love it.


Now onto Mom's gift box. She got "My Fair Lady." Her box was a hat box, cause Eliza wears some great hats in the movie. Didn't think I'd be able to actually get a hat box, but I found one! On the side of the box, I wrote "Wouldn't it be lover-ly" (from one of the songs in the movie). Then I filled it up with pink tissue paper. Mom also got a pen pot, but her flowers were more pink/purple, like the ones Eliza sold in the beginning of the movie. Then I made her a teacup candle, cause everyone knows a lady drinks tea. The box got adorned her box with black and white ribbons, just like on Eliza's "Going to the Races" outfit. It's so cute and I know Mom will get it.


Now, since I know the ladies will be reading this, I won't divulge the price, but needless to say they were very affordable and a great way to jazz up a DVD for anyone. Plus, I got to try out some great new crafts. The pen pot was seen on craftser.org and the candle cups are from Martha Stewart. So easy and so fun to make. This would make a great gift for anyone. Just vary the movie and the trinkets to go with it. I can't wait to make more of these, now I just need a reason!
And to all the Moms out there, "Happy Mother's Day!"

Apr 29, 2009

L is for Little

So, I know it's been forever since I've posted. I promise I'll be better!

Well a few weeks back I got a great custom order on etsy. Someone loved my Retro D Apron, but also wanted a matching apron for their little one (she's about 3). So I went to my pattern and shrunk it down and adjusted it and VOILA! a new Little Retro D Apron.

It's the same paneled retro style as the big apron, just shrunk down to fit our littlest customers. I can't imagine a better Mother's Day gift than a set of these for you and your little one or your favorite Mommy n' Me pair!
These little aprons will be appearing in the store soon, so check back often, you never know what we have coming up next!
A big thanks to etsian "thelmaartie" for putting in the order and allowing me to make her aprons! Hope you enjoyed them!

Jan 29, 2009

K is for Katie

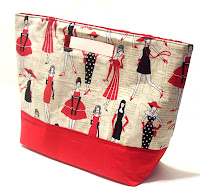
Katie is athe first bag I made my own pattern for from scratch. So, she holds a special place for me. After doing plenty of research and adapting what I saw, I made the first Katie bag for myself, as kind of a trial. I got great feedback about the bag, so I slightly adjusted my pattern, to make up for some little improvements I saw it needed, and it was ready for sale.

Why Katie you may ask? Well, I pick the names of women I admire for my bags. And since this one had the handle built in (a do-it-myself kinda gal, if you will), I asked my husband for some suggestions. (Somehow, he always seems to have the right name for me!) I wanted the name of a woman who had done it all, or at least was trying to, a groundbreaker. It was right after America had gotten its first female anchor of the nightly network news (something I aspired to when I was younger), so Katie, named after Katie Couric, was a natural choice.
I love it when someone scoops up a Katie bag for themselves. She's a good little bag that can take you from day to night, work to play! I even saw some variations of the Katie bag on the runway recently. Gotta love that!

Dec 30, 2008

J is for Jolly

I LOVE Christmas! And this year I did make some gifts, but opted not to make all of them just to save my own sanity.

This year I planned ahead and had all of my gift ready to go with a full week before christmas. I even managed to finish up the gifts I was making before leaving to Noche Buena dinner on the 24th. That was a HUGE accomplishment for me! Especially, since I was having some overnight guests that night. Somehow it all managed to get done, the house cleaned, the gifts wrapped and me all cute.

Here's me and Abuela on Noche Buena (Christmas Eve). Abuela makes the best pork for Christmas. And it was as delicious as ever this year. A plate of rice and beans and pork and I was set. If I can only have one thing for Christmas, it would definitely be Abuela pork. Though nothing can replace Abuelo's whole pork cooked in the "Caja China." It was an all day event for him to get the pork cooked, but man was it worth it. Needless to say, for me, it's just not Christmas without pork.

Here's my Christmas tree. I got a new pre-lit tree this year and it's the best. Not having to deal with putting on the lights just made it so much faster. I tend to get allergies, so a real tree is out of the question in my house, plus I'm sure the animals would just have too much fun with a real tree. I definitely have a red, green and silver theme to my decor, but I do put up some special ornaments that we've collected over the years. This year's special edition, was the Starship Enterprise (yes from Star Trek). It even lights up. I put it prominently on the tree, cause it was just too cute.

We had a great Christmas this year, and I hope you all had a great holiday too, no matter what you celebrate! And may 2009 bring you lots of luck and joy, health and happiness!

Dec 23, 2008

I is for Inspiraton (for gifts)

There has been so much stuff going on I haven't had the chance to update. But I did find some gift inspiration for the people at work.

After being off the week after Thanksgiving I was able to watch all the crafty shows and get some inspiraton for some gifts for my co-workers. But my department is about 20 people, what's a crafty girl to do? How about making some cute, easy and yummy gifts.

So I made the 20 people in my deparment Hot Chocolate Cones! And I took pictures for all of you to see how easy it was.

All you need is:
Wilton Disposable Decorating Bags
Rubber Bands
Curling Ribbon
Hot Chocolate Mix
Mini Marshmallows
Mini Chocolate Chips
  1. First take your empty decorating bag and empty two of the hot chocolate packets inside.
  2. Top with a handful of mini marshmallows.

  3. Cover the marshmallows with mini chocolate chips.

  4. Secure the top with a rubber band.

  5. Cut off excess bag leaving about 1 1/2 inches after the rubber band.

  6. Decorate with curling ribbon.

  7. Attach the instructions.

I made my own instructions tag with some cardstock and regular printer paper. After all, you've gotta let the people getting the hot chocolate know how to make it. To make it even easier, here are my instructions (there are 9 to a page). Feel free to use them to make your gifts!

... instructions coming soon!...

Since I am "Ms. Overacheiving Crafter," I also made chocolate spoons to go with the cones. These are even easier, and would make a good gift by themselves.

Here's what you need for the spoons:
Plastic spoons
Chocolate Chips
Plastic bags (the little kind used for chocolate lollipops)
Curling Ribbon
Sprinkles/crushed candy canes (optional)
  1. Melt the chocolate chips in the microwave. Place chips in a microwave safe bowl and microwave on high for 30 seconds. Stir. Microwave in 15 second increments stirring after each until chocolate is smooth, shiny and completely melted. (NOTE: On my first attempt melting chocolate in the microwave years ago, the chocolate got burnt. I didn't know to stir it. If it doesn't get stirred, it will always look like the chips you put in there. The stirring helps it melt, so don't skip this step!)

  2. Dip the plastic spoon into the melted chocolate making sure to cover the front and back of the bowl part of the spoon.

  3. Add crushed candy canes or sprinkles while the chocolate is still wet, if desired.
  4. Place on waxed paper (parchment or freezer paper works too) and into the fridge to harden.
  5. Once hardened, place in the treat bags and secure with a piece of ribbon.

The total cost for all 20 of the cones I made and gave as gifts was just under $20. It came out to about 95 cents for each. You can't beat that. And best of all everyone loved the cones and said what a great idea it was. Lots of my co-workers told me they took it home right away to try the hot chocolate. So I would say it was a HIT!