Showing posts with label bag. Show all posts

Jul 8, 2013

Gym bag redo

The bag I had been using to go to the gym (which was just a reusable tote bag) broke last week. I decided I should make myself a cute new gym bag that incorporated all the features I really wanted. I've been designing my heart away and adding so many little details that it's turning into a slightly bigger project than I anticipated. But I needed a new bag to go to the gym on Monday, so I grabbed one of the many drawstring bags that I have collected over time and made it a little cuter.

I grabbed my basic drawstring bag and some scraps of fabric and a little interfacing and got to work. I measured the logo (8 inches by 2 inches) and made it a little bigger so I could make sure it would all be covered. I also made it taller to be able to use it as a pocket. My final fabric size was 8 1/2" by 6 1/2". I cut two out of the fabric and one of interfacing, to give the pocket some body. 

I ironed the interfacing to one of the pocket pieces and then placed them wrong sides together. I sewed around one long side and both short sides using 1/4" seams. On the other long side, I also sewed with a 1/4" seam, but left a small part open, so I could turn the pocket right side out. I clipped the corners, turned the pocket right side out and ironed it flat. Then I topstitched the top edge of the pocket. I pinned the pocket in place to make sure it stayed centered and then sewed down the sides and bottom, leaving the top part open. Make sure you are only sewing on one side of the bag and not both, or you will sew your bag shut!

This was a little too plain, so I decided I needed to cover the top part of bag, where the drawstrings are. The drawstring pockets were about 1 inch wide, so I knew I had to make them a little wider to make sure the drawstring would still work. I cut 3 inch strips for each of the sides of the bag. I made them a little wider than the bag itself (I eyeballed it), so I could fold in each side to keep the seams clean. After sewing in the short sides, I ironed in a 1/4" seam allowance on each of the long sides.


I then folded these strips in half leaving one side slightly longer than the other (like in bias binding). I sandwiched the strips around the edge of the bag, and sewed them around the existing drawstring pockets on the bag.

There was one strip for each side of the bag and it really gave it the finishing touch it needed.

And voila! I took an old junky bag and gave it a makeover. And now I can show up to the gym without having a half broken bag.

I'm still working on my huge gym bag, and I hope to be able to start working on that one soon. I'll keep you updated on that one.

Have you ever revamped an old item to make an even better one?

Aug 21, 2012

DIY travel accessories

I finally got around to making a few things I wanted to make myself for my trip. They aren't anything super huge, but I think they came out really cute. And I used a ton of Pinterest tutorials, so I've more than met my quota for this month.

First was my "First Aid" pouch. I actually finished this a couple of weeks ago. I used some polka dot fabric and my basic zippered pouch pattern, but I altered the size. I left this pouch without a gusset, but added the first aid cross and embroidery to keep it cute. The "First Aid" was freehanded and then hand embroidered before I added the interfacing. Since I use iron on interfacing, it's extra insurance that the stitches won't get undone. This little pouch is just perfect to hold a few first aid supplies.

Next, I finally made myself a boxy pouch. I took cues from my fabric and quilted along the grey wavy lines. I think it came out pretty cute, though it was time consuming to quilt it. The corners were making me a little antsy while I was sewing them, but I only had to redo them once or twice, so it wasnt' that bad for the first time. This pouch is such a perfect size, it fits all of my non-liquid toiletries perfectly.

Then I decided to make a makeup brush roll in the same fabrics (hey, if I'm making them myself, they might as well match!). This is another one that was easier than it looked. I always get intimidated when they tell you to measure things yourself. But I laid out my brushes and marked the pockets. I even made the first pocket extra big for my kabuki brush. I sewed them all up, and miracle of miracles, they all fit. 

I didn't quilt this one just to save on time. The quilting would have been cute, but I had so many things to make I just didn't have time for it. I think it looks great anyways.


After that, I made myself a luggage tag. I figured my business card enveloped in plastic was a bit ghetto. I added a pretty D to the back of the tag. I'm kinda shocked it came out so cute since I freehanded it.

I hope to be able to make myself a new makeup pouch tonight, cause now it has to match the rest of my travel accessories.

May 16, 2012

WIP Wednesday

I actually started and completed a project this week. This is something I've had on the back burner forever, so I'm glad I finally got around to it.

I bought some cherry grocery bag fabric at JoAnn's when they started carrying it (I wanna say it was a year ago). This fabric is the stuff they make the re-useable grocery bags out of and is some weird non-woven material. I wanted to make my own shopping bag, so I used the Charlie Reusable Grocery Bag pattern from Burda Style.

The bag was pretty easy to make and since I was using this fabric, I really didn't have to finish the edges, but you know how I am. So, I zig-zagged the edges in a contrasting color to give the bag some interest. I have to say that the trickiest part of making the bag was creating the folds on the bottom. But I adjusted them, to give it a gusseted feel.

The one thing about this bag though, is that it's HUGE. Like super duper big. It has a pouch sewn on the inside that you can stuff the bag into, so you can keep it in your purse, but I had to do some major origami to get it to fit.

But I'm loving my new shopping bag. And since it's in my purse already, I have no more excuses of leaving my shopping bags at home.

Feb 15, 2012

My new purse

I'd been needing a new purse for a while and I finally got around to finishing it. I started it after New Years, but then got a terrible cold and after that had to plan Mom's Beatles Bash. So a few weeks ago, I finally got around to finishing this one. And now I've gotten around to taking the pics of it, so here it is.

I used the Blossom Bag pattern from Amy Butler. I found this pattern on Pinterest and saw that it was a free Amy Butler pattern and had to try it out. I took my JoAnn's giftcard (given to me by my brother for Christmas) to the store and got all of the supplies. (This means this bag was FREE for me!)

The pattern called for Peltex (Peltex 70). Now, I always use craft weight iron-on interfacing (Craft Fuse 808) for my bags, but I'd been wanting to try the Peltex for a while. Let me warn you, this stuff is thick! It's a little harder to work with, but gives the finished bag some real structure. And in the end, I think I may have become a Peltex convert.

The interior of the bag totally rivals the handbags you see in the stores. It has two comparments/dividers to really keep everything organized in your bag. I loved this design element, but it required some handstitching to tack them into place. I hate hand stitching. It was all the Peltex's fault, I just couldn't get all of those layers underneath the sewing machine foot.

I may make a few adjustments next time I make this pattern. (The instructions for adding the zipper to one compartment are just weird.) But I'm really, really in love with my new bag. And after using the purse for a while, the Peltex has softened up a little on the flap, but the bottom still has plenty of strength from it. And I did love the Amy Butler pattern. It feels just as fancy as the bags from the department stores, but has my spin on it with my cute fabrics. I may have to make myself the handbag style one next.

So what do you think? How do you like my new bag?

Oct 31, 2011

Final costume: Come fly with me

I thought I was only doing two costumes this year, til Mom called. She called grandma first to make her a skirt and suit jacket. Then she called me to make a bag. I knew what she had in mind. Mom was gonna be a Pan Am stewardess.

Now I admit, if I would have had more time, this would have totally been up my alley! But I just didn't have time this year. But Mom brought over the bright blue fabric and we got to work. Grandma made the skirt and jacket (and her own pattern, of course), mom made the hat, and I was making the bag.

I made the bag with no pattern, kinda winging it along the way, but I love how it came out. I added a zipper and a gusset and everything. I'm even thinking of making a similar bag for myself.

The biggest obstacle was getting the logo on the bag. If there would have been more time, we would have screenprinted or stenciled the it on. But since this bag was made in a couple of hours, we got creative. I used a printout of the logo that Mom gave me. We put it in a ziploc bag and I pinned it in place. Then I zig-zagged around the edge of the logo and cut away the extra ziploc bag. I wasn't sure this was gonna work, but it did. And it was a great way to get the logo on there quick.

Mom got some little black pumps and white gloves to finish off her look. I think she looks great. I'm sure she was totally the most creative cosutme at the office today.

That's it for costume making for me this year. Happy Halloween to you all!

Aug 24, 2011

Cute baby stuff

... for my soon to be niece!

One of my best friends, Kristina, is having a little girl. So I went up to see her in Orlando for the baby shower a couple of weeks ago.

When Kris and I started talking about the shower she asked me for something. She wanted me to maker her a new baby bag. So after some online browsing and finding the right fabric, I made her this. It's HUGE and so roomy inside. It's got tons of pockets to keep all that baby stuff handy, plus since it's all cotton, it's totally washable. And it's sure to say that no one else will have this bag! Gotta love custom handmade!

Now I couldn't just make the bag, my new niece needed a cute outfit too. So using my Martha Stewart Encyclopedia of Sewing, I made the baby kimono in this great bright print.

The little bows are too cute for words. And since it called for bias binding, I was in luck, since I always have some extra rolling around my studio.

Now we girls know that no outfit is complete without a pair of shoes. And the Martha Stewart felt booties are the easiest things to whip up and so freaking cute. I think she might get a few more pairs before she's ready for big girl shoes!

I had a few other projects that I wasn't able to finish up before the shower, but I'll have them done soon.

And I hope to post some pics of the shower too, since I hosted it and I have to say it was awfully cute!

Jan 29, 2009

K is for Katie

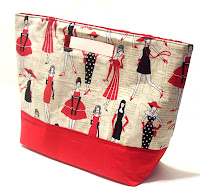
Katie is athe first bag I made my own pattern for from scratch. So, she holds a special place for me. After doing plenty of research and adapting what I saw, I made the first Katie bag for myself, as kind of a trial. I got great feedback about the bag, so I slightly adjusted my pattern, to make up for some little improvements I saw it needed, and it was ready for sale.

Why Katie you may ask? Well, I pick the names of women I admire for my bags. And since this one had the handle built in (a do-it-myself kinda gal, if you will), I asked my husband for some suggestions. (Somehow, he always seems to have the right name for me!) I wanted the name of a woman who had done it all, or at least was trying to, a groundbreaker. It was right after America had gotten its first female anchor of the nightly network news (something I aspired to when I was younger), so Katie, named after Katie Couric, was a natural choice.
I love it when someone scoops up a Katie bag for themselves. She's a good little bag that can take you from day to night, work to play! I even saw some variations of the Katie bag on the runway recently. Gotta love that!