Showing posts with label costume time. Show all posts

Oct 30, 2018

Quick handmade Halloween costume - Skeleton shirt

I had a Halloween themed half marathon this past weekend. I wasn't going to wear a costume, cause I had no idea what to make, but then I had an idea. A sugar skill costume would be easy and festive. With not enough time for an Amazon prime order to arrive, I had to make something myself.

Since I had left this to the night before the race, paint was out of the question. I didn't think there would be enough time for it to dry. Fabric is my medium of choice anyways, so fabric it was! And I had a few shirts that were in the goodwill pile that were perfect to use for this purpose.

Here are the supplies you will need:
  • 1 black t-shirt
  • 1 white t-shirt
  • Thread (optional)
And the following tools:
  • Pencil
  • Paper
  • Scissors
  • Needle or sewing machine (optional)
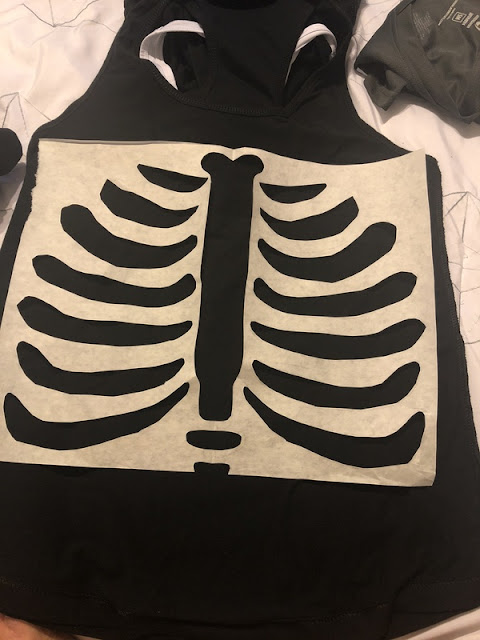
I skteched out a rough skeleton ribcage on a piece of paper, I foled it in half and cut our the "bone" parts. Then I opened it up and checked for placement on the black shirt.


I found that it was easier to fold the shirt in half, and then cut out the "bone" parts on the shirt as it was folded in half. This way both sides would be even. I pinned the pattern in place, and then cut the fabric where the holes were. I also cut them a little smaller than what I had on the pattern, since I knew it would stretch out when I put it on.


At this point you can just wear this black shirt over a white shirt. It will give the illusion of the bones peeking through.

But since I was making this a running costume, I decided to sew the white part on the inside of the black shirt, so I wouldn't have to wear a double shirt for my run.

*This part is optional, but makes for a lighter shirt.
Cut a piece of white fabric big enough to cover all the cut out parts of the black shirt. Pin to the wrong side of the black shirt. Stitch around the edge of the cut out design to hold in place.


And you're all done! Add some skull makeup to complete your costume, and maybe even some flowers for the sugar skull look.


This took me a total of about an hour to put together, and the hardest part was drawing out the pattern. There's no reason not to have a Halloween costume, even if you have left it to the last minute.

Happy making and happy Halloween!

Oct 16, 2013

Minnie costumes with circle skirt tutorial

Since I did a RunDisney race, I needed to make a costume. That's just part of the fun of doing a race at Disney. For my first RunDisney race, Kristina and I kept it simple and decided to go as Minnie Mouse, a classic.


It was a simple costume, black t-shirts, Minnie skirts and ears. We had the black tees, that was the easy part. Then we got the red and white polka dotted fabric to make the skirts. I decided to make half circle skirts. These would give us enough room to move while we ran, but wouldn't be to bulky. And I wanted to have elastic waistbands for ease of movement and getting them on and off. The hardest part was making the patterns. It involves math! Eww! But it's not that hard, if I can do it anyone can.

You just need two measurements, waist measurement and the length of your skirt.

Here are my measurements (so you can see how it works):
Waist: 29 inches
Length: 13 inches

I'm gonna get math-y on you now... Your waist measurement is the circumference. In order to get the radius of the circle to be able to make your pattern you need to divide your waist measurment by 2 x 3.14 (π). But I'll make it even easier for you. Take your waist measurement and add two inches for seams. Then divide by 6.28. My equation looked like this:  31 ÷ 6.28 = 4.93 (I rounded up to 5)


The answer to your equation is the radius of your skirt to make a full circle skirt. Since I was making a half circle skirt, I doubled this number to 10. I then pulled out my pattern paper and marked 10 inches from the corner of the paper. You could use a compass to make the circle, but seriously who has one that big? So just mark your 10 inches (or whatever your measurement is on various spots all starting at the corner, then just connect the dots.


After you have the waist marked, measure from your waist line down to your length. I measured 13 inches down and made the same markings. Then I played connect the dots and cut out my pattern. This pattern will be very wide, so if you have standard 44 inch wide cotton, like I did, you will have to open it up to be able to get your whole pieces cut out.


I cut out two of these pieces and serged all of the edges. I sewed up the sides seams, and then it was time to attach the waistband. The waistband was just a piece of 3 inch elastic cut to my waist measurement plus 1 inch. I sewed the edges of the elastic together to create a tube. Next, I had to attach the skirt to the elastic waist. I pinned the skirt to the elastic at the front, back and sides. The skirt was a bit bigger than the elastic, which you need to be able to get into the skirt. All you have to do is stretch the elastic as you sew and this should give it the stretch it needs.


After you've attached the skirt to the waistband, just sew a small hem. Your skirt is ready to go. (Don't forget to try it on to make sure it fits right.)


Next was time to make the ears. And luckily I found a great tutorial on Bombshell Bling for Minnie ears. Instead of using hot glue, I sewed the ears and used heavy Peltex 70 interfacing for the interior. Our bows were made of the same fabric as the skirts and it was all attached to dollar store headbands. I didn't know if the ears would make it through the race, but they lasted all day long.


This costume was pretty easy once you have the skirt pattern made. Don't let it intimidate you, just measure it out start cutting. This would make a great Halloween costume too. It's super comfy, so it's great for a night full of trick or treating.


P.S. I might have a made a mini verison of this for my niece too!

I love making these running costumes. And since I have a few more RunDisney races in my future, and there will be plenty more race costumes coming.

Have you ever made a costume?

Oct 31, 2012

Costume time 2012: Honey Boo Boo

Honey Boo Boo was the pop culture sensation of the summer and she is everywhere you look now. My friends and I decided that someone had to be Honey Boo Boo for Halloween this year, and after some convincing, Yoanna finally did it.

Once she agreed, I got working on the costume. Since I had made so many tutus this year, I figured another one wouldn't be too bad, so I used pink this time and added a top layer of sparkly tulle to really make it pageant ready. The leftover tulle was transformed into poufy pageant sleeves that were added to a sequined tank top. Then a ribbon and some glitter paint made a perfect pageant sash to complete the look.

Honey Boo Boo needed to get into hair and makeup, so we got to work poufing up her hair and giving her pageant ready makeup. We added lots of sparkle and pink lips to match the dress. Then a bow and a crown and Honey Boo Boo was ready to go.

Accessories really made the look and her trophy and go-go juice (Mountain Dew) totally made her from regular pageant girl into Honey Boo Boo Child!

Crazy as it sounds, this was the only Honey Boo Boo in the whole office! She became a mini-celebrity and everyone wanted pictures of her and with her. Plus she totally got into character telling everyone to "Redneckognize" and "Holla for a dolla, Honey Boo Boo Child!"

What was your Halloween costume this year?

Costume time 2012: Finding Nemo crew

Happy Halloween! It's time to reveal all of the costumes I made this Halloween. You've already seen mine, but it really was part of a group costume. A few of my friends and I decided to go with a Finding Nemo theme for Halloween this year. My friend, Damaris, had been inspired to dress up as Darla from Finding Nemo since she got her braces this year, so the rest of us decided to coordinate with her.
source
Check out Damaris in her thrifted and customized Darla outfit. Her headgear is acutally the handle from a can of paint that she attached with a rubber band. She thrifted and dyed the sweater and took the shorts from her dad. This costume was amazing and had people laughing all day long.

I was Nemo, complete with gimpy fin.
source
I took a more creative take on it and made my tutu, fins (one big and one little), and I also embellished my tank.
 
Karina was Dory (if you know her, you know she's the chatty one, so it suits her perfectly!).
source
I made Karina's tutu and fins. She added a sparkly tank top and embellished the fins, her hair and ankle with a bit of yellow to mimic the yellow at the end of Dory's fins. Everyone totally loved her as Dory.

And once our friend Carlo heard we were doing Nemo, he wanted in. He loves Nemo and totally knew who he wanted to be, the wise Gill.
source
This was a total last minute costume, but I think it came out pretty good. I asked Carlo to bring me a black hoodie that I could add things to. I freehanded the top fin and stuffed it with a bit of fiberfill to keep it standing. Then I attached the fins, one whole and one all mangled. He was totally psyched with his Gill costume.

We had a great time with our costumes, and once people realized who we were they loved it. They are still counting the ballots for the costume contest, so keep your fingers crossed for us.

I hope everyone is having a great and sugar-filled halloween! I'll have another costume post up shortly.

Oct 28, 2012

Costume time 2012: Making a tutu

Halloween is only a few days away, and I've actually finished my costume. (I have to blame this on the Halloween party that I went to a few days ago.)

My costume this year was pretty easy, I embellished a store bought tank top and then made a tutu to finish off the look. I wanted my tutu to have layers of color that formed stripes, so I didn't make the strip tutus that are all over the internet now.

I used 2 yards of fabric for each layer. The tulle was 60 inches wide, so I folded it in quarters for the top two layers and thirds for the bottom layer. Then I just ran a long straight stitch across the top of each layer to gather it all up. I also sewed the short ends of the tulle closed, so I had a tulle tube.
For the top I used a super wide 3 in elastic. Just make the elastic big enough to fit around you where you want the tutu to lie, and then stitch it up. Remember to leave yourself enough room to slip it on and off.

Next is the part that I find the most tedious, attaching the skirt to the elastic. I'm not one to use pins usually, but this process kind of requires them. You're gonna need to mark the front and back of your elastic and your tulle tube. The back is where your seam is, so just fold your elastic tube in half right on the seam. Mark the side opposite the seam with a pin. This is your front. Do the same thing with your tulle tube. Next, you're gonna pin both seams together and then both front marks together. Pull your gathering stitches until the tulle is the same size as the elastic. Use pins to hold this in place.

Now change your machine to the stretch stitch. On my machine it's stitch J. It looks like a dotted zig zag. This will allow the elastic to stretch better than a regular straight stitch.

I stitched right over the gathering stitches.

Since I was making a tiered skirt, I wanted to tier my layers of tulle. So I attached my first layer about half way up the elastic.

Then gather your next layer and pin it in place. I put it right under the stitching for the last layer of tulle, so I could get the "striped" effect I wanted. I stitched this one on then added one more layer for my last stripe.

Then try it on and check the length. I left my tulle folded as I sewed and then cut it once I had tried it on and saw what length I wanted. Just cut it straight across, no hemming needed.

And voila! You have your tutu. It's great for any costume (cause who doesn't love a tutu), and you can even make a smaller version for your little ones. Here I am all decked out for my party. (I'm supposed to be Nemo--yeah, it's an artistic interpretation.)

What are you gonna be for halloween? Are you making your costume?